Modification Guide for Ryobi Table SawsUpdated 5 months ago
Ryobi and a few other models of table saws don’t have standard T-tracks on their table saws. Nor do they have tracks with a rectangular cross-section. Rather, the tracks are a rectangular cutout, with tabs to allow a special miter gauge to fit, which comes with the saw.
Accessories that would normally fit into a T-track will not fit into this track. A special T-shaped insert is required, which the user has to make.
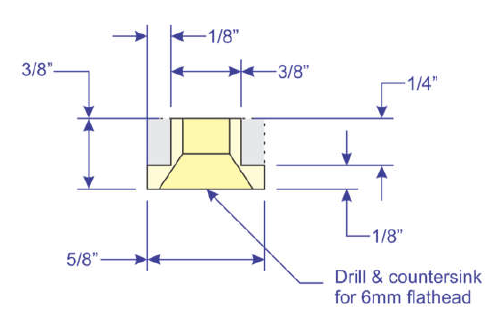
This same T-shaped insert is also useful for crosscut and miter sleds, as well as any other jig that the user wants to make for use with their Ryobi table saw. The cross-section is shown in the drawing below.
To make this insert, start out with some straight-grained hardwood. Maple is excellent for this purpose, but I have used poplar successfully. Poplar is also considerably cheaper than maple.
Step 1
First, cut a strip of wood to 5/8” x 3/8”. Check to see that your strip fits into the miter slots on the saw table, not including the part of the slot that has the tabs. Some slight trimming, which can be done with a sander, might be necessary.
You want a snug fit. It is easier to make strips that are too long, then cut them down later. Besides, the extra material can be useful for other jigs.
Step 2
Cut out the two sides of the strip with a straight bit on the router table, removing a section 1/8” x ¼” from each side, as shown by the grey area in the diagram.
Step 3
Cut a piece of the T-section long enough that it will catch on both of the tabs in the miter track. Longer is better than shorter.
Step 4
Drill and countersink for two 6mm flathead screws to be installed from the underside of the strip, 2-1/2” apart and centered. These holes need to be located so that the Thin Rip Gauge will be located before the saw’s blade, when installed on the table saw.
Step 5
Remove the flathead screws installed in the Thin Rip Gauge guide blocks and reinstall them through the strip you have created. Attach with CA glue.
Attach the strip to the Thin Rip Gauge and fasten with the original threaded knobs.